7 Ways to Decorate Tin Cans
Last updated on 22 June 2020
This post may contain affiliate links. If you make a purchase with one of these links, I recieve a small commission at no additional cost to you. Read the full Affiliate Policy.

Tin cans are seriously the most useful items ever
Do you know how many things you can store in a tin?! So. Many. And what’s even better is that when you wash and reuse a tin can in this handy-dandy way, you’re recycling at the same time! Saving the planet one tin can at a time.
I had been collecting tins for a little while, with no real plan as to how to use them, when, finally, one day I thought I would decorate them. And I ended up trying a bunch of different ways to do so. It’s a big mix of stencilling, using other materials like lace, wallpaper and newspaper, and good ol’ paint.
Here are 7 ways you can decorate tin cans to make them look awesome and a lot less like a simple silver tin (and also some ideas of what you can put in them).

1. Wallpaper – try some fake flowers, or go for real ones.
I have a bunch of wallpaper samples which I have often used for various projects, but I just love this creamy paper with a light blue flower on it. Cut the wallpaper so it fits around the tin. Apply with Mod Podge or PVA of some sort of similar clear glue.
At the top and bottom, if it overhangs the edge, make some vertical cuts in the excess, and fold into the tin. Glue. If you don’t have wallpaper, scrapbooking paper would also look great.

2. Newspaper – keep your chopsticks or other small kitchen utensils in a tin
Ah the newspaper. There are so many things you can do with a newspaper, and covering a tin is one of them. Simply rip up a bunch of newspaper (either writing or pictures….or try both), and use Mod Podge or similar to apply it to the tin. Place some of the pieces of paper so they hang over the edges. Then fold them over and glue.

3. Bubblewrap – the standard desk utensils in a tin
I love how this one turned out. First, paint the tin the colour of your choice. When it’s dry, paint another colour onto some bubble wrap (enough to cover the whole tin), place the tin at one end of the bubblewrap, and roll the tin along, allowing the bubblewrap to cling to the tin.
When you get to the end, and the tin is covered, use your hands and gently tap or push the bubble wrap onto the tin so as to be sure the colour comes off the wrap and goes onto the tin. Carefully remove. Ta da!
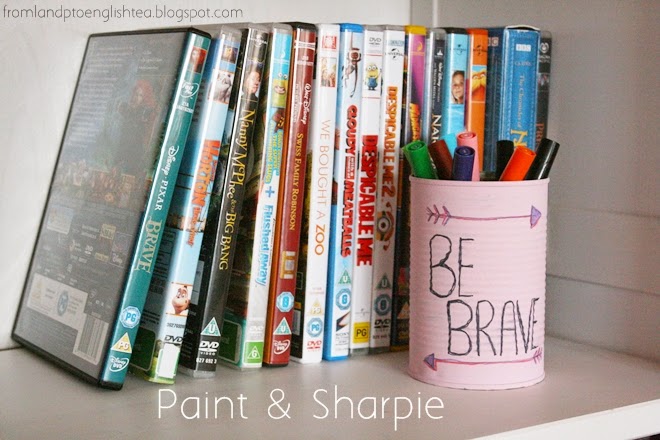
4. Paint and Sharpie – pop your colourful pens in
Doesn’t have to be a Sharpie; in fact, I didn’t actually use one. Just a permanent marker will do. Paint the tin in a colour of your choice, and grab your pens and go nuts.
I used a short quote that I love: “Be Brave”, and a couple of arrows. Alternatively, draw a picture or some patterns on it. You don’t have to write words. But using pens on a painted tin always looks nifty.

5. Washi Tape – keep your TV/radio/DVD remotes in a tin
Ah, the trusty washi tape. Seriously, I don’t know what I did before I knew washi tape existed. I love it so much. This is so simple, but it looks really effective when you’re done. Simply choose your tape and wrap it around the tin.
You could also try putting your washi tape the other way, vertical down the tin. Another option is painting the tin, and putting washi tape at the top and bottom, so you can see both paint and tape.

6. Lace – or you could simply have it on display
Oh, lace. You’re so pretty. While I painted the tin yellow first, you could always see what it looked like without paint, just straight onto the silver of the tin. This is just like any of the other wrapping decorations.
Cover your tin in something like Mod Podge, and carefully roll the lace onto the tin, cutting it at the end when it meets the first edge (of the lace). If you have excess at the top and bottom, you can either chop it off or fold it over the tin’s edges and glue it down.

7. Popsicle Sticks – hide your incense/nice smelly thing bottle inside a tin, so the sticks stick out the top
Okay, so this has to be one of my favourites. For this one, you’ll need either patience or a hot glue gun. I went for the hot glue gun because out of the two, that’s what I have.
Starting with one stick, place some glue along the stick (I suggest putting the glue always on the stick first, rather than on the tine because the tin will set it more quickly than the stick), and stick it onto the tin, making sure it’s straight. If the first one isn’t straight, the rest won’t be either.
From there, continue sticking your popsicle sticks around the tin, either in some sort of pattern, or do it randomly. If you don’t have coloured popsicle sticks but want some more than the plain ones, try painting the sticks first, then applying to the tin.
Bonus ideas
Some more ideas of ways you could decorate tins:
- Magazine images, or text. Paint a tin a colour, and then find a magazine picture or draw a picture, and stick it on one side.
- Glitter: Cover tin in Mod Podge and then sprinkle glitter all over it.
- Bows: Paint a tin, tie a bow around it.
- String: Create patterns on the tin by sticking string to it, or creating glue swirls with a hot glue gun; paint over it.
- Another string/rope idea: Grab some string or thin rope, and glue it around the tin, moving from top to bottom.

There we go! 7 ideas for decorating, and some bonus ideas if you’re not feeling any of the previous ones. What are you waiting for? Eat those baked beans! Reuse those tins.
Anjali Kay
Anjali Kay is an Aotearoa New Zealand-based blogger and book lover sharing travel inspiration, bookish posts, the occasional creative project, and a lot of practical blogging tips here at This Splendid Shambles. Based in Auckland, she's been writing book reviews and travel posts, sharing creative projects and blogging tips since she started her first blog in 2009. When she's not working on her own blog, Anjali also offers blog coaching and support for bloggers who want real guidance from someone who's actually done the work, and is a few chapters ahead of them.

Having fun? Check out these posts!

10 Christmas DIYs

Christmas | 9 Alternative Christmas Trees
