

DIY Fireplace Bookshelf
Last updated on 7 June 2024
This post may contain affiliate links. If you make a purchase with one of these links, I recieve a small commission at no additional cost to you. Read the full Affiliate Policy.

Ever wanted to create a DIY fireplace bookshelf?
I hadn’t either, but we had this old fireplace spot in our study that was just sitting there, blocked up and unused, and looking simply bricky. We could do better than that. One idea I had seen online was adding simple wooden planks and bricks into spaces like this one, to create a DIY fireplace bookshelf. Being book people … that’s what we did.
What you need to make a bookshelf in your fireplace
- Bricks – make sure they’re the same size. You’ll need to determine how many you need based on the fireplace size
- Planks of wood for your shelves. If your fireplace has a bumpy bottom/floor, you’ll want one for the bottom too.
- Saw to cut your planks
- Books!
How to create your own DIY fireplace bookshelf
You barely need instructions, but here’s what we did.
- Clean out the fireplace: Okay don’t skip this step. Make sure your fireplace is super clean, or as clean as you’re going to get it. I recommend vacuuming it out or using a dry cloth to get any bits out. If you’re using a wet cloth, make sure you dry it well or leave it for an hour or so to air dry. You don’t want things getting damp.
- Clean up your bricks: If you bricks are straight from outside, you’ going to want to clean them up a bit. Make sure they’re dry, and dirt free. Bricks generally are a bit crumbling at times, so don’t worry if you’re wiping them and stuff just keeps coming off. Get them to an adequate stage of cleanliness and that’ll be fine.
- Measure the space: You’re going to be cutting or sourcing planks of wood to fit the fireplace space, so you need to measure the depth of the fireplace and also the width. Our fireplace was narrower at the top than the bottom, but that didn’t make a difference to the space we were going to put the planks. Just something to be aware of.
- Cut your planks: Cut your planks if they need cutting.
- Brick numbers: Determine how many bricks you’re going to want for each shelf. We used two bricks for our shelf gap, but it will depend on the height of the books you want to pop into the bookshelf. Take into account the depth of the planks, too.
- Assemble: The beauty of this DIY fireplace bookshelf is that it’s so simple to put together. Bricks on the ‘ground’ or on another plank at the bottom, then the plank, then bricks, then plank and so forth.
- Populate the shelf: With books! Or other nicknacks and things you have.
It does take a little jiggling here and there to get the balance right, but you’ll get the hang of it. Once the books are on it, then it all settles a little bit.
💡 Tip: If the back of the fireplace has a cool brick detail, try not to fill up the fireplace with books, so you can see the back peeping through.
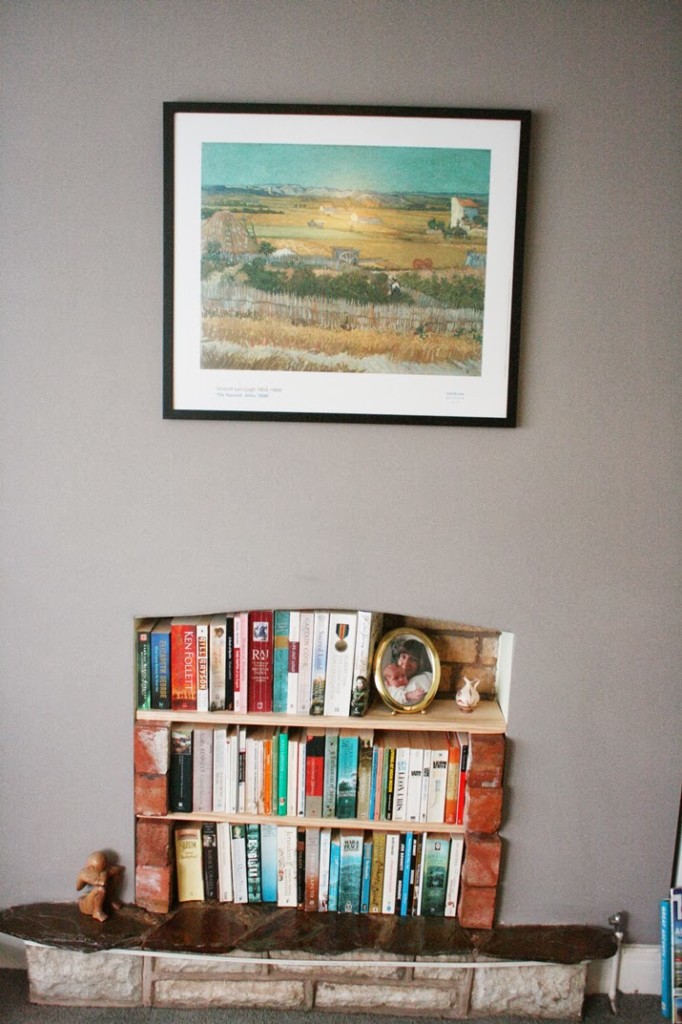
So what do you think?
Do you like this idea? What other ways could you fill an empty, unused fireplace? Let me know in the comments!

Anjali Kay
Anjali Kay is an Aotearoa New Zealand-based blogger and book lover sharing travel inspiration, bookish posts, the occasional creative project, and a lot of practical blogging tips here at This Splendid Shambles. Based in Auckland, she's been writing book reviews and travel posts, sharing creative projects and blogging tips since she started her first blog in 2009. When she's not working on her own blog, Anjali also offers blog coaching and support for bloggers who want real guidance from someone who's actually done the work, and is a few chapters ahead of them.


Having fun? Check out these posts!

DIY Notebook

12 Harry Potter DIY Crafts to Try This Week
