

DIY Half Painted Vase…
Last updated on 21 April 2016
This post may contain affiliate links. If you make a purchase with one of these links, I recieve a small commission at no additional cost to you. Read the full Affiliate Policy.

I know I know, DIY overload lately. I would actually schedule them so it was like, one a week or something..and sometimes I do…but then I just get too excited about something and I need to share right there and then. Sad, I know. But there we have it. If you get sick of seeing DIY posts, feel free to yell at me and I’ll refrain…well, I’ll try.
A few posts back, when I was telling you about making a CD holder, I mentioned that we had an awesome Scrap store here, where I got the CD holder, and many other things. I also managed to score this cool vase. It’s originally from Wilko (seriously, I tried to make it through a post without mentioning that shop…but I couldn’t even do it…), because the sticker on the bottom told me so. I wanted to cool it up a little bit, but wasn’t really sure how. After it sat on my table for a good few weeks, I decided I would try painting it. This is what I came up with.

It was really easy to do. To make this, I used Wilko (dang it!) white spray paint primer stuff, masking tape (forgot to photograph), packing paper (though you won’t really need this…it’s coz I’m messy), a pot of tester paint, a paint brush and, obviously, the vase.
First, decide where you want your colour to be. I went with just painting the bottom section, not even half way up, thinking that I could always paint more, but it would be difficult to un-do paint. Obviously, you can paint the whole thing. Or not. Up to you. I used the masking tape to tape right around the vase, in as much of a straight line as I could manage.
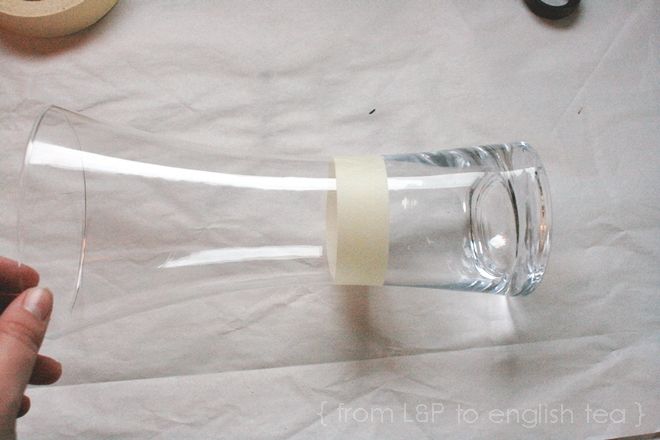
Then, because I’m ridiculous bad at spray painting, I also covered the entire top section of the vase with packing paper (you can use any type of paper, we just happen to have packing paper still left over from when we moved over here – newspaper would be fine) and then secured it with masking tape so that no part of the vase that I didn’t want covered in paint was showing. You don’t actually need to do this, but because I’m actually so bad at spray painting, I knew that I would get it everywhere, even with the original masking tape line.

Now to spray paint! Flip the vase upside down, if you’re doing the bottom section, and put it somewhere where you can spray paint without fainting from the fumes. Once you’re sure you’re not going to pass out, attack it with spray paint. Remember that the masking tape line (whether you covered the rest of the vase or not) is there to be a barrier between yay-paint and nay-paint. It also means you get a nice straight (supposedly) line. You probably only need one coat of white if you’re going to paint a colour over the top, but I did two, just to be safe.

After it’s all dry, and leaving the masking tape (and packing paper) on, paint over the white with the colour of your choice. Allow it to dry, and take the masking tape (and packing paper) off. Voila! Done-skis!


Fill it with flowers, or pretty pebbles, or whatever takes your fancy!


Anjali Kay
Anjali Kay is an Aotearoa New Zealand-based blogger and book lover sharing travel inspiration, bookish posts, the occasional creative project, and a lot of practical blogging tips here at This Splendid Shambles. Based in Auckland, she's been writing book reviews and travel posts, sharing creative projects and blogging tips since she started her first blog in 2009. When she's not working on her own blog, Anjali also offers blog coaching and support for bloggers who want real guidance from someone who's actually done the work, and is a few chapters ahead of them.


Having fun? Check out these posts!

Guest Post | A Guide to Furniture Reupholstering Fabrics
D.I.Y Light Box…
